When you set up in a conference room to be switched you will need to be aware of a few additional pieces of equipment and how to use them. They are listed below.
- Blackmagic Design ATEM Television Studio HD
- Blackmagic Design HyperDeck Studio Mini
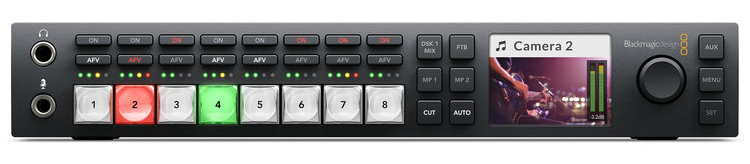
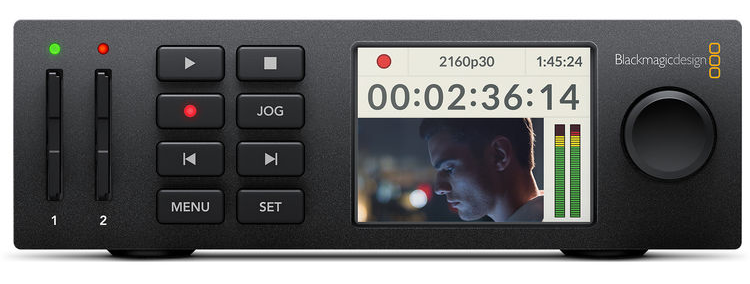
The ATEM Televeision Studio HD is your switcher. It is responsible for taking in the various signals from your cameras, or a laptop and cutting them together and mixing with sound. The HydperDeck Studio Mini is your recorder. It takes two SD cards and it records everything you switch to it.
ATEM Television Studio HD
HyperDeck Studio Mini
Basic Setup
1. First start by setting your your cameras. Once they are in place set up your switcher and Hyperdeck recorder making sure to plug the power in.
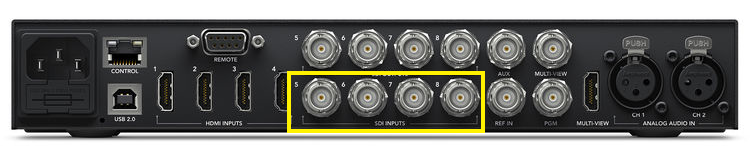
2. Next run your HDSDI cables from your camera to HDSDI inputs 5-8 on your switcher. If you are using HDMI you will use inputs 1-4. You will also want to confirm that your camera is currently set to output via SDI if that is what you have plugged in and not HDMI.
NOTE: If you are running sound out from a mixer board you can plug the XLR cables into the left and right XLR ports seen on the far right. This however most likely wont be necessary but is good to know.
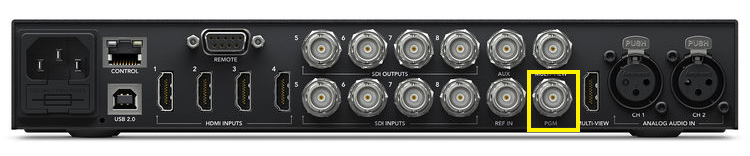
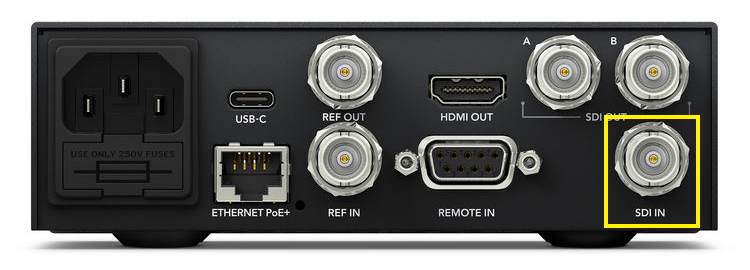
3. The next step is to connect your switcher to your HyperDeck so it receives signal too. Plug your short HDSDI cable into the Program (PGM) port on the back of the switcher and connect it to the SDI In port on the HyperDeck.
4. After you have the two connected, plug your monitor in via the HDMI cable in your back to the Multiview out port on the back of the ATEM. It is beside the XLR ports. This will allow you to see all of your screens when switching.
5. Next up you will want to insert your SD cards and format them. Make sure you format them ExFat. This can be read by Mac and PC. To format hit the menu button on the front, then turn the jog/shuttle wheel and use the set button to enter the ‘record’ menu on the LCD and select ‘format card’.
Also make sure that the Codec is set to ProRes LT for conference filming.

Operation
Audio Controls
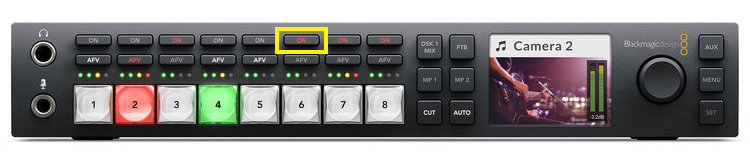
To turn on the audio feed from your camera, simply press the ON button above its source button. Now the audio from that input will be sent to the built in audio mixer and can be heard on the program output. Do this only for the camera that is taking an audio feed from a lapel mic or handheld mic that the speaker is using. If it just has “scratch” audio then leave that button off. Also don’t use AFV (Audio follows video). It will switch your audio source feed from your master quality audio (ie lapel) to your scratch audio (ie shotgun mic).
Best practice is to adjust your audio levels in your camera, then they will come though find on the mixer, however you can use the mixer itself to adjust some levels as well. If the LCD says MASTER at the top then turning the nob will adjust the master audio levels. If you do have multiple sources of audio turned on and one of this needs to be adjusted, you can select the clip and then the top of the LCD screen should say the camera name (ie CAMERA 5) and then you can turn up or down said cameras audio.
Switching Modes
There are two types of switching modes, Cut Bus, and Program/Preview. Program/Preview lets you first bring up a preview of your shot before you choose to go live with it, where as Cut Bus is an instant cut to your source signal. For conferences we usually use Cut Bus.
To change to Cut Bus mode, use the following steps.
- Press the menu button to display the menus
- Scroll with the knob though the menu to the “Settings menu”
- Press the set button and you will see the settings menu page will be selected
- Now scroll down the list to the mode menu and select it by pressing the set button
- Scroll to the cut bus mode and select it by pressing set
- Press the menu button to back out of the menus back to the video preview screen