ALC Course Layout Designer Responsibilities:
As the staff course layout designer, this is a position that is unique in it’s own way. You aren’t a full-time faculty, but you are not a student worker. You have student workers that work for you and help you to get your work done. As course layout designer you report to James Gigante (the Media Manager) and ultimately Adam Fenner (Director).
This position is also unique as James is often out of the office filming. And sometimes you will go along on trips too! However, it’s important to make sure to be innovate and constructive with your time as you won’t always have someone there to tell you what to do. Frequently checking in with James is important in order to stay on task and find out what the priorities are. It is your job to let him know when things get finished.
The key responsibilities in this position are:
- Know how to navigate the NAS for necessary information and content
- Designing courses in Muse
- Importing content to canvas
- Fixing any corrections/errors that arise
- Troubleshooting errors that are passed along from James while he is out of office, or while he is in office but has handed the task to you
- Essentially fix whatever James directs you to fix
- Being proactive in making sure your work is organized appropriately.
- Be organized so that if you are out of the office, and someone needs something you’ve been working on, they can find it without too much trouble.
- Design work from Adam or other ALC employees
- Design work from Adam usually gets bumped to the top of the priority list unless otherwise specified
- Attending conferences/trips as needed or requested by James
- Delegating work to student workers as needed if James doesn’t have them on a specific task
- Visiting the corrections spreadsheet and making sure any necessary changes are up-todate.
- Keeping your office space clean and organized
- Making sure your computer is up-to-date (not ignoring updates).
Each of these responsibilities can be broken down into their own sections.
Storage
Navigating the NAS
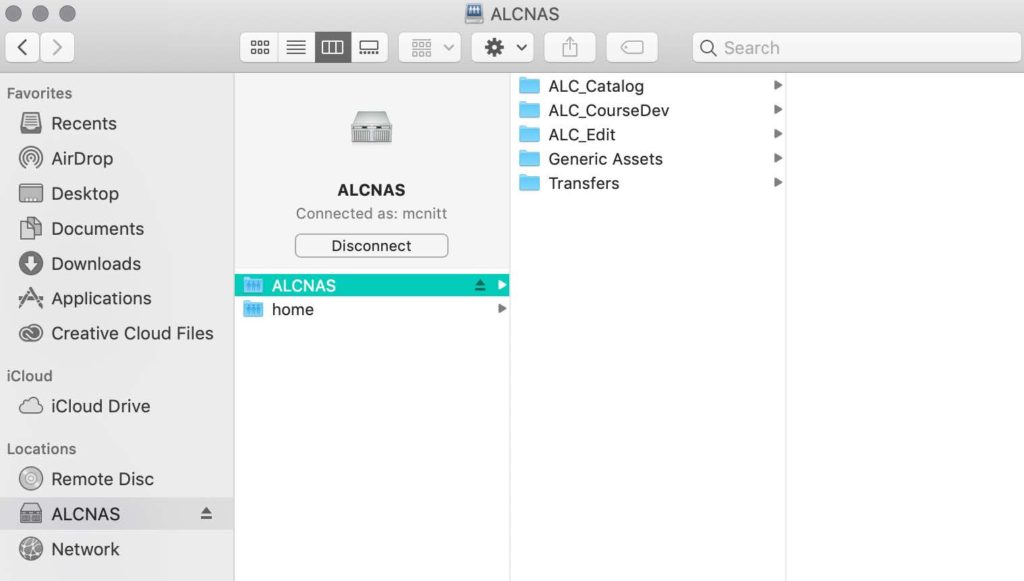
- The NAS is our storage device. Steve often refers to this as the “counter space.” We have two other storage devices that we use to store our content that we don’t need readily available.
- NAS (kitchen counter – we’re using this content currently)
- Drobo – (refrigerator) – where we put projects that we don’t need readily available, but still might need access too from time to time
- LTO – (freezer) – this is where we store things we don’t usually use much anymore
- You will need a username and pw for the NAS which James or Steve will arrange for you.
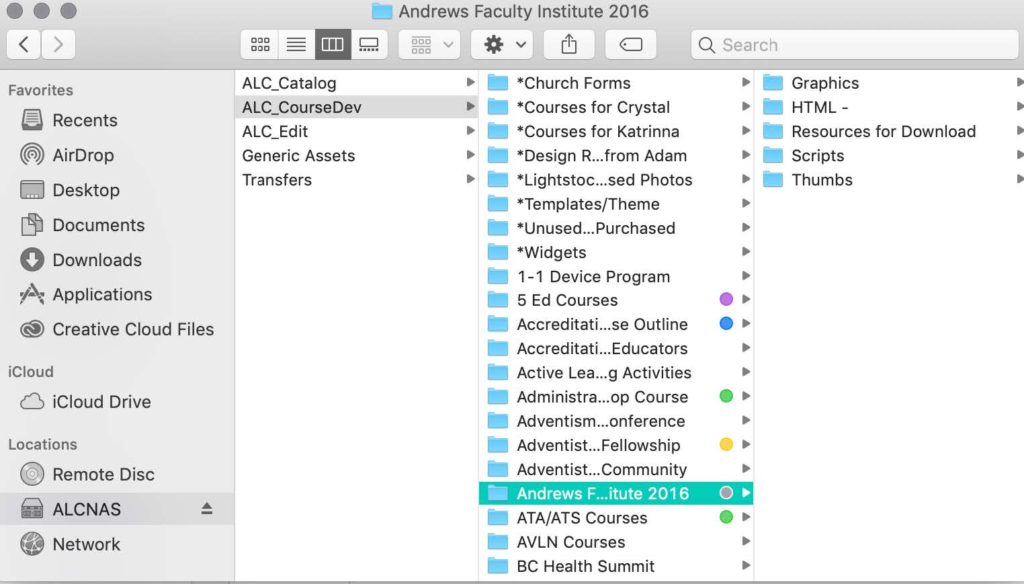
- Within the NAS you will find several folders – you really only need to worry about three
- ALC Catalog
- ALC CourseDev
- ALC Edit
- Generic Assets
- Temp
- Transfers
- In CourseDev – you will find all the courses we are currently working on, or have worked on recently. Inside each of these folders is content you will need – and I will refresh later what this content is. Here is an example:
- Course Name: Sexual Abuse Reclaiming Hope
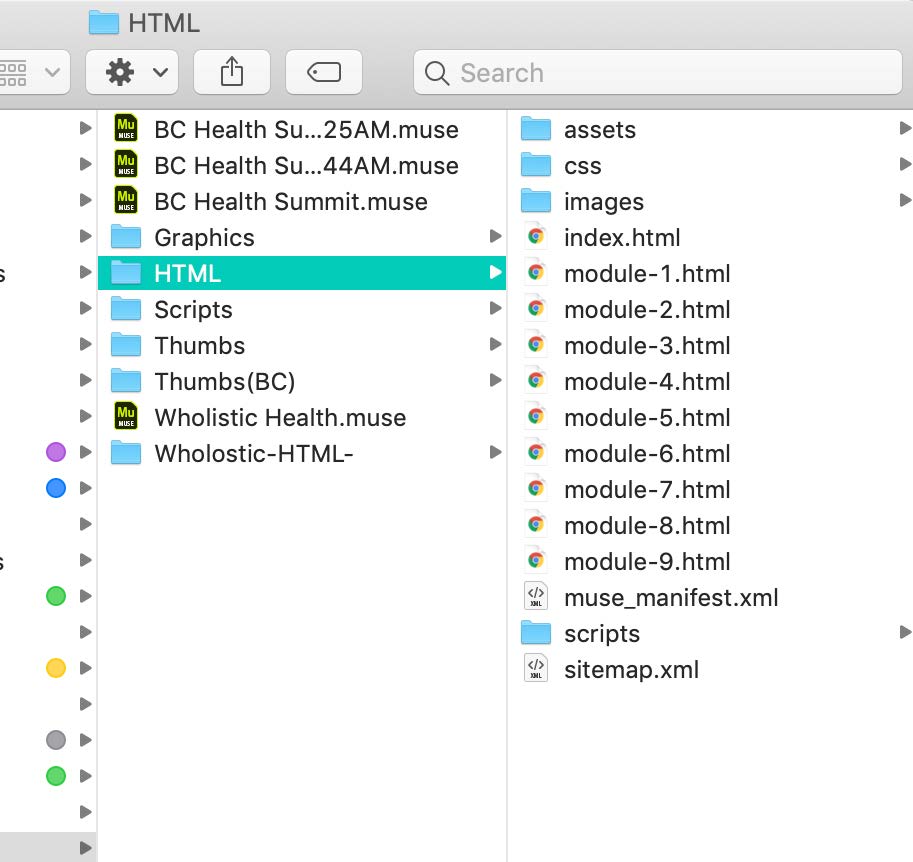
- Graphics
- HTML
- Resources for Downloads
- Scripts
- Thumbs
- Course Name: Sexual Abuse Reclaiming Hope
- Scripts – in the scripts folder you will find your ‘course path’ that you follow to create the course. Make sure that the course path has been edited by an editor by verifying with James. Sometimes he will tell you to start building the course even though it’s not yet been edited.
- HTML – this is your exported HTML code from Muse that you will later put in Filezilla
- Resources for Downloads – this is where you will find any assets or documents you need to link to the site your building. These are usually provided with the course path. However, sometimes they are emailed later and you will need to add them to this folder.
- Thumbs – this is where you will save your thumbnails to when you place thumbnails on videos in Muse.
- Graphics – place your cover photo here, any photos of course instructors, or any other graphics you use during course design
Designing Courses in Muse
Muse is a beautiful piece of Adobe software, but is also sometimes your enemy. The way you would think to troubleshoot a problem, might actually require you do to the opposite to fix it. It’s important to be open minded as the possibilities might not be intuitive.
There is a template on the NAS that is your ‘skeleton’ so to speak to use when you start building a new course. Within that template you will find
• An A-Master
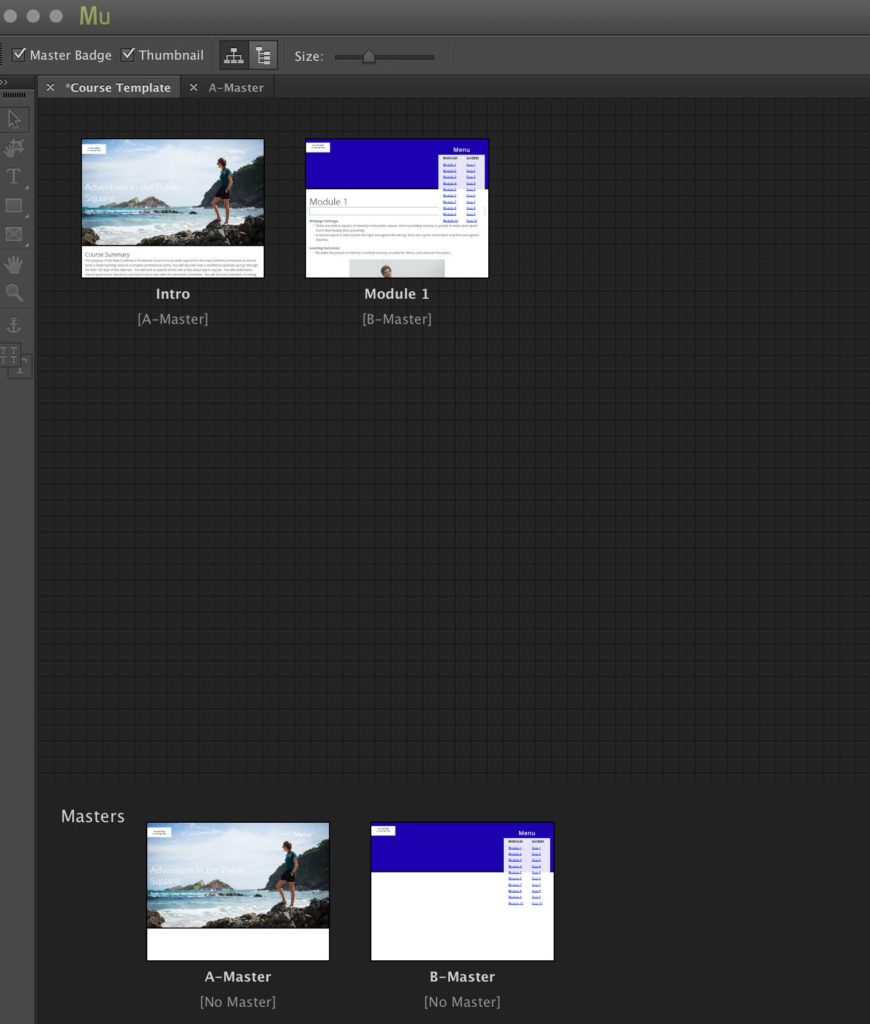
- A B-Master
- Intro Page
- Subsequent pages to follow
The A-Master is responsibly for your site landing page ONLY.
The B-Master is responsible for the pages within your site.
A-Master
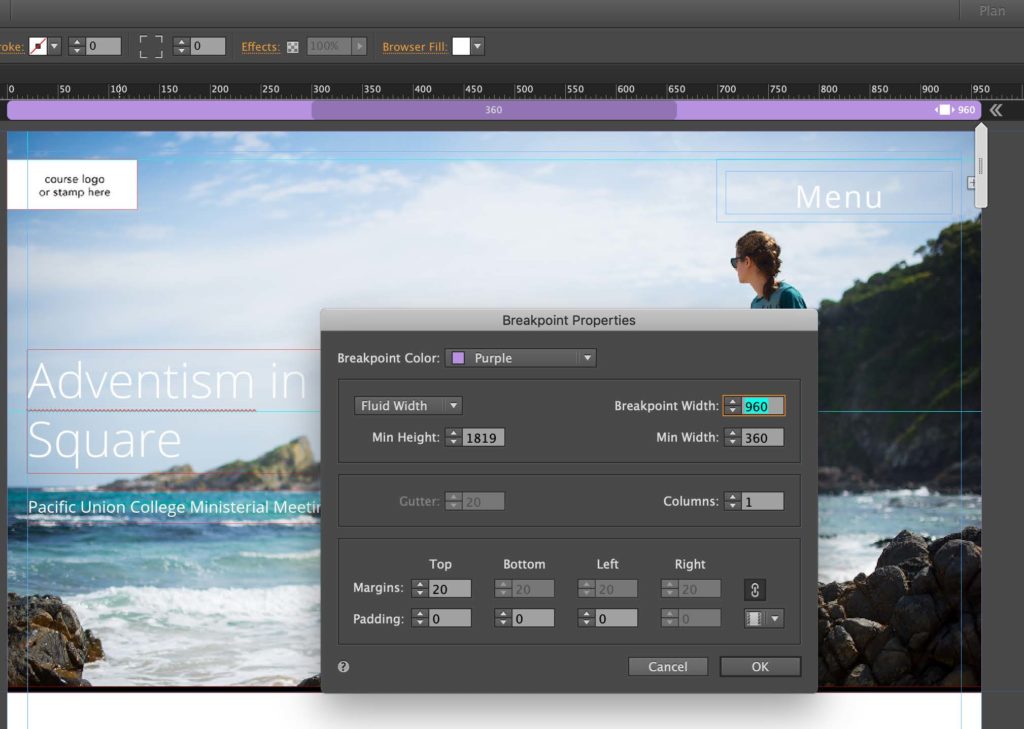
- Your A-Master should have a measured rectangle at the top that goes from 0-550 (numbers on left)
- At the top your breakpoints should be:
- 960
- 360
- Breakpoints show how wide the page will be and how narrow it will be (for tablet and mobile devices)
- Double click in the breakpoint area (purple in the photo attached) to change the breakpoints.
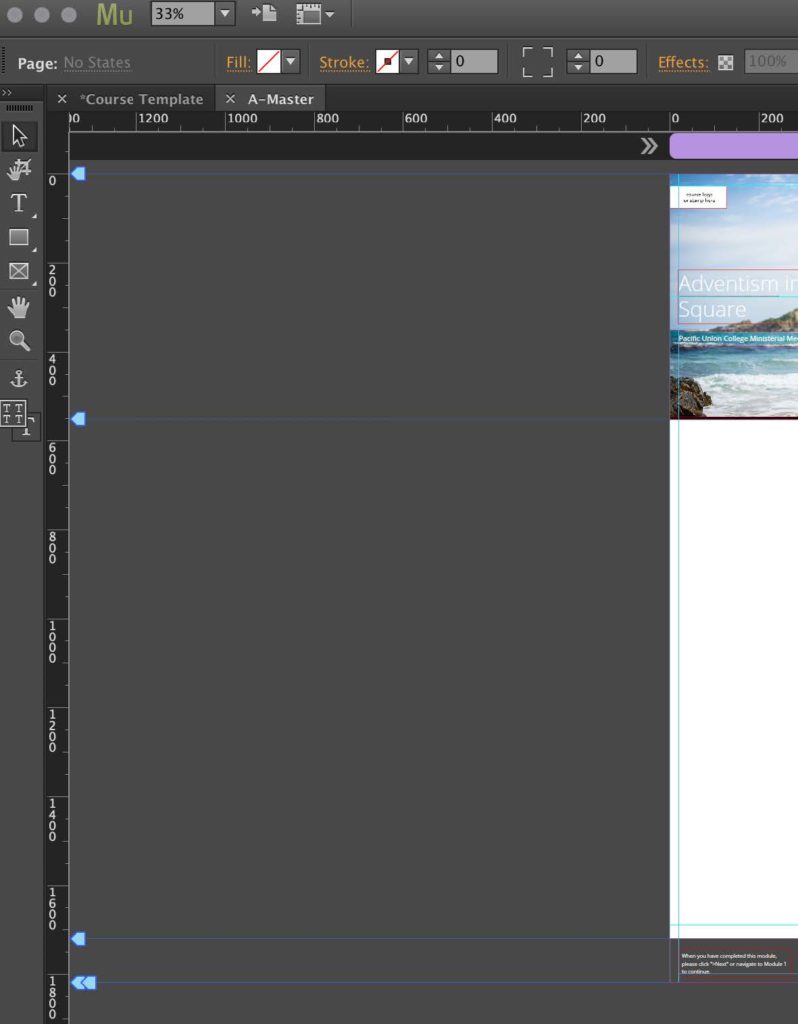
- Your top left blue arrow should be “Top of Page”
- Your next blue arrow should be your “Header” which should be right below your rectangle and right above your line
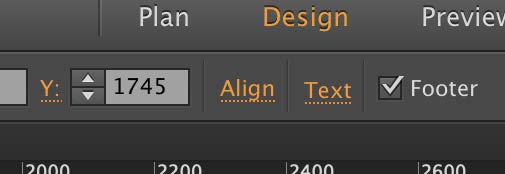
- Your next blue arrow will be with your “Footer” and will be at the bottom of your page, but above your footer content.
- Your next two arrows should be your
- “Bottom of Browser”
- “Bottom of Page”
- Inside your footer section is a grey rectangle (click on the grey rectangle – and also each of its contents individually to check them as footer)
- In the top right hand corner, make this this is checked as “footer” while it is selected
- Make sure triangle with the exclamation point in it is checked as footer
- The next button should also be checked as footer
- You can also check to make sure they are footer items by selecting them and the going to the menu and clicking “object” and making sure there is a check mark next to “Footer Item”

- Right click on the checkered box with the triangle/exclamation point in it (while it’s selected) and click “Edit HTML”
- In this section you should have this
- <base target=”_parent”/>
- If you don’t see that, paste the above code there.
- When you are ready to add your photo you selected to your course, you can place it here in your A-Master in your “Header” section.
- Make sure to drag this photo into the “graphics” folder on the NAS for this course – that way all the assets stay linked together.
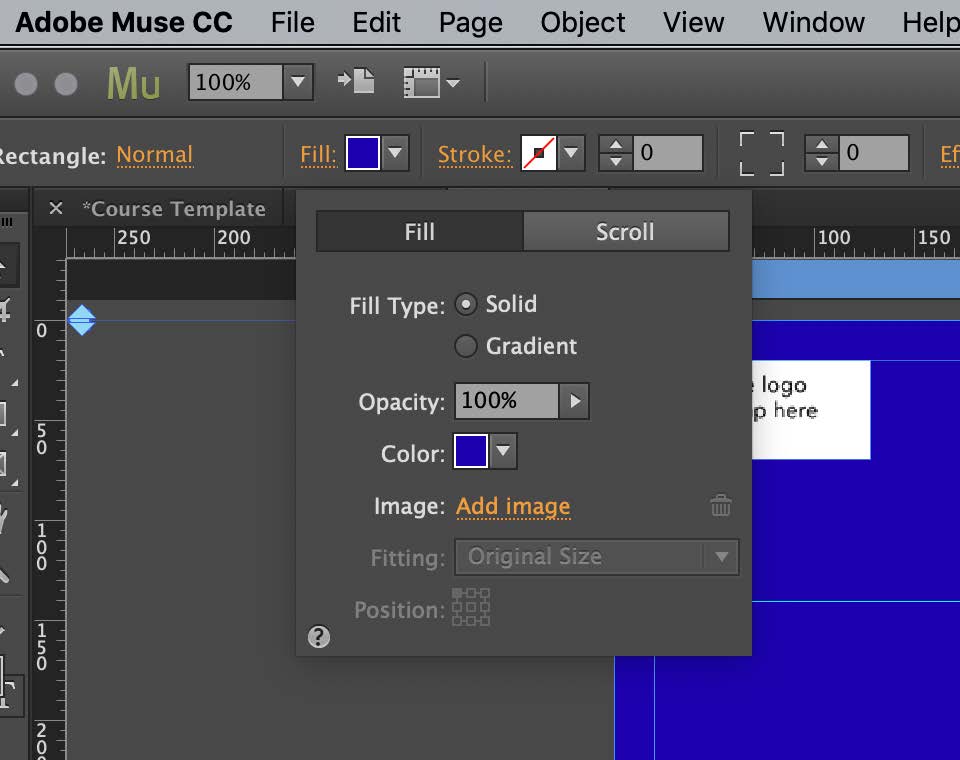
- Draw a regular square (not the one with the ‘x’ through it) in the rectangle area you have.
- Go to the menu and click “Fill”
- After clicking “Fill” you can click “Add Image”
- You want to be sure that your image you add is set to “Scale to Fill”
- You can then adjust the placement as needed
- This A-Master section is where you change the name of your course title and any subtitles it might have
- You will also create your MENU in this section
- On the top left corner is a “logo” placeholder. Place the corresponding logo for your course here.
- The top right corner is “MENU” and we will discuss how to create the menu after you’ve created your content in canvas.
Next let’s look at the B-Master
B-Master
- In your B-Master your blue arrows on the left will follow the same “guide” so to speak as your A-Master.
- You will also place the logo here and do the same with your header image.
- Only a portion of your header image will show up so you can pick which section of the photo you’d like it to show.
- If you are having trouble getting an image that will not take away from the title or text on your A-Master or B-Master you can add a black or white box over the top with an opacity that is brought down to 50% or so. This will fade the picture some so that the text shows up best.
Content for A-Master
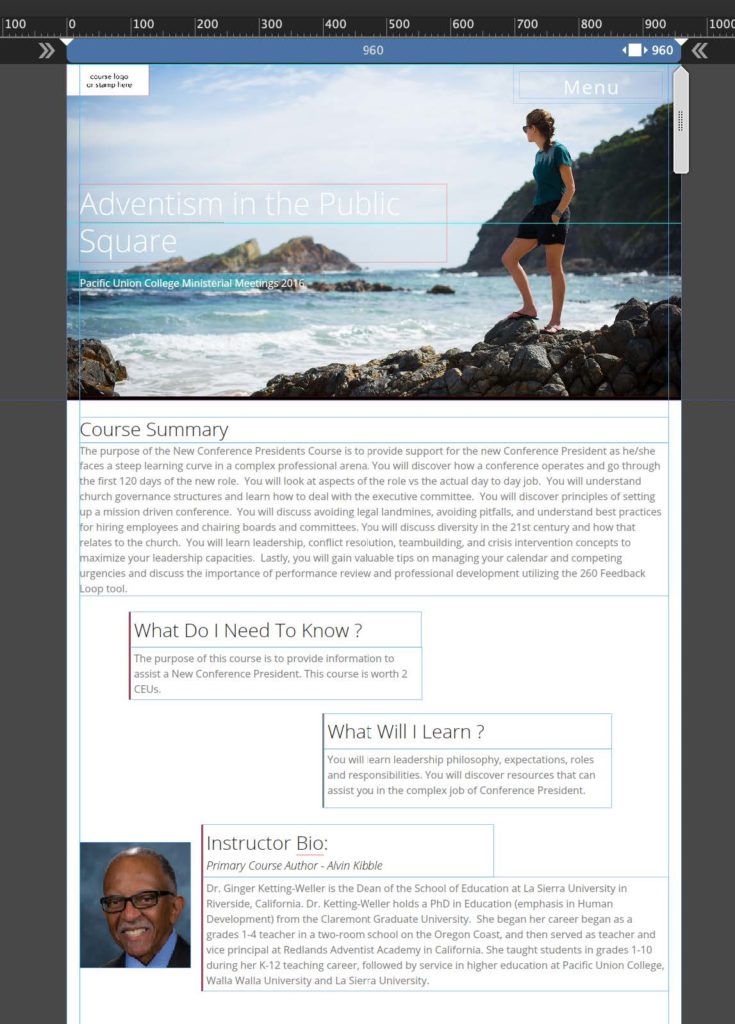
- The content for your A-Master will be relatively standard for each course. The list of what’s included on the A-Master/Landing Page is:
- Course Summary
- What Do I Need to Know?
- What Will I Learn?
- Instructor Bio
- Required/Suggested Resources
- CEU Values (Usually in the “What Will I Learn” section)
- Sometimes there will be more/less content for this page – it will depend from course to course and it’s important to follow your script to see how your landing page is customized.
Now that your A-Master and B-Master are created, you can start working on the content for each page.
Within your dashboard in Muse, you can now add a page for each module you will have in your course. Your subsequent pages will all be “B-Master” pages unless you are doing something different, but in 99% of cases you will use B-Master pages.
- If you want to add another page you can right click on the first Module Page and click “Duplicate”
- You can also move these pages below other pages, or next to as you see fit. Sometimes if you have Module 1.1, 1.2, 1.3, it is easier to place them below one another. This is completely up to you though. The pages will link to the links you make in canvas so ultimately that is where the ‘order’ comes into play.
- Most courses on the module pages will contain the following:
- Module Number
- Title of Module
- Learning Outcomes/Objectives
- Webpage Verbiage
- Video
- Any more webpage verbiage or photos
- Learning Activity
- This is where you will look at the script and paste the necessary information in Muse.
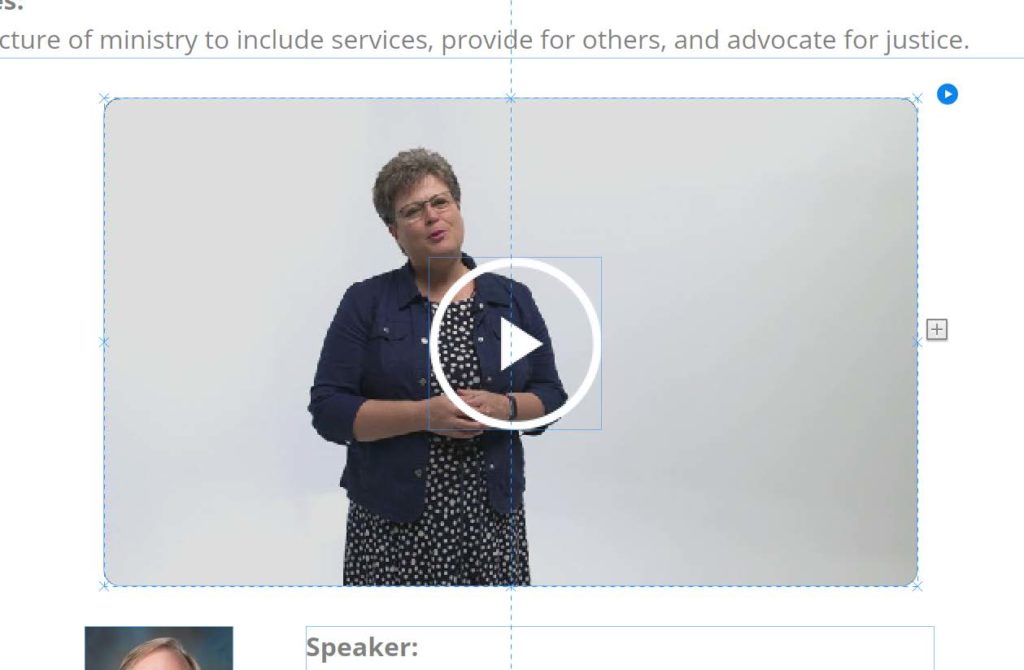
How to Add a Video
Adding a video is quite simple, but you need to grab a code from an outside source.
- First you will need to make sure your videos are complete and edited in
- ALC Edit
- Within the ALC Edit folder are all the finished or in progress projects that the video editors or content developers are working on.
- Complete videos for each course will be in the appropriate course name folder and then in a folder labeled “Output
- The output folder should have the videos titled correctly, if not, don’t just guess. Talk to Steve or James (or another video editor) to figure out what is what.
- You can also watch the first 30 seconds of a video to see what the title is – although they should be labeled correctly. If they aren’t – be sure to let someone know.
- Once you have located your videos, you are now ready to upload them to “Brightcove.”
- Brightcove is a host site for all of our video content. It’s a place to load our videos that creates a HTML/URL to be used and also a thumbnail for the video for your to use in Muse.
- James or Steve will create a Brightcove account for you to use and grant you access to the ALC video content

- On the homepage for brightcove, you will find a drop down menu under “Home” that has the features you will be using. You will mainly use:
- Upload – where you will drag files to upload
- Media – where you will find already uploaded files
- To upload a video, you simply drag the video onto the upload page of bright cove
- The videos listed are all uploaded videos – you can click on one to start working with the thumbnail and link
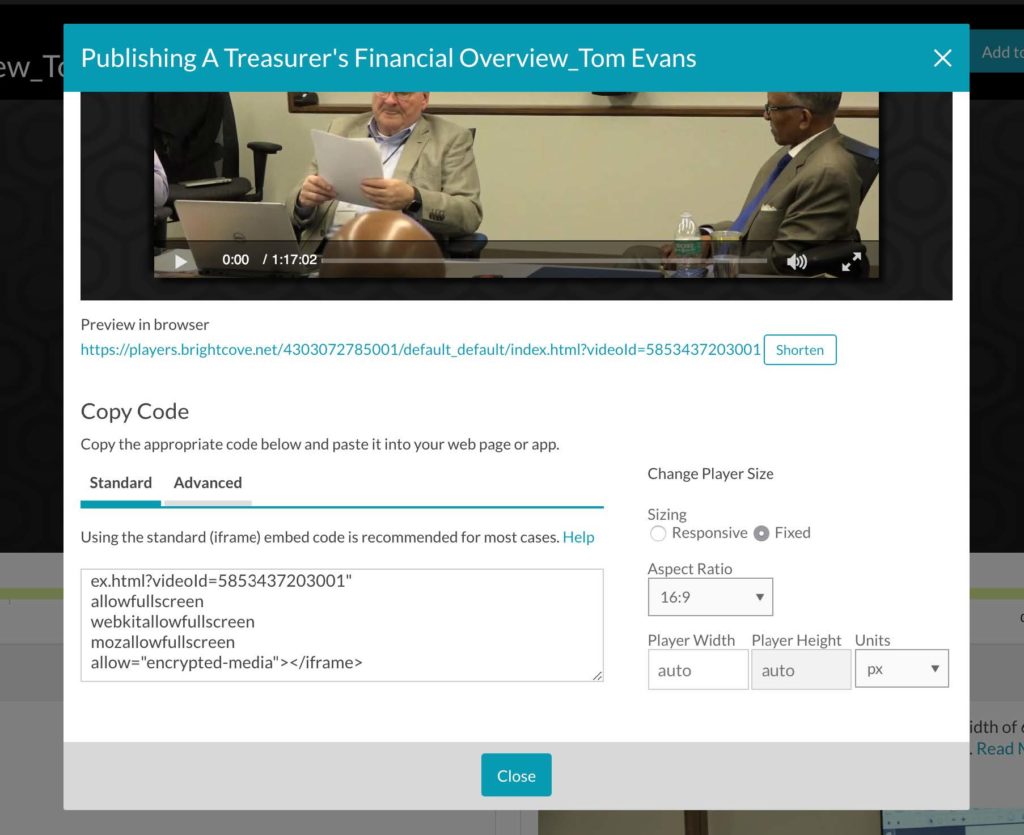
- To grab your link to embed, click “Publish and Embed” in the top right corner
- Then click “web player”
- To grab your link to embed, click “Publish and Embed” in the top right corner

- It is there you will find the embed code – I will explain where to place it later
- Next you are going to save a thumbnail of the image to place in Muse.
- There are two images provided – thumbnail and poster.
- I prefer to use poster as it seems to be higher quality, but it doesn’t matter really.
- Right click on the image and then click “save image as”
- Save the image in your graphics folder (for this particular course) on the NAS
- You are now ready to embed the video in Muse.
Embedding a video in Muse
- Embedding a video can be tricky, but once you get the hang of it, it’s very straightforward.
- There should already be a video frame in the Muse template file (usually in the first module
- Once you have located the video, click until you see a little blue arrow and also x’s on all the corners.
- Click on the blue arrow in the top right corner.
- Then tick the second box from the bottom that says “show widget parts while editing”
- You will untick this box when you’re done embedding the video
- Next, right click in the video box and click “edit HTML”
- This is where you will paste your embed code
- When you copy from brightcove, it forces you to copy the entire code, however you only need a certain part of it.
- The only part you need is in bold/underlined here:
- <iframe src=”//players.brightcove.net/4303072785001/default_default/index.html?videold=5853437203001I ” allowfullscreen webkitallowfullscreenmozallowfullscreenallow=”encrypted-media”></iframe>
- When pasting this code, simply replace the code that is in the “code here” quotation marks. If you replace the entire bright cove code for the entire code that is in the video box in Muse, it WILL NOT work.
- REPLACE JUST THE CODE
- When you’re done you can hop out and untick the “show widget parts while editing”
- If you can’t find the box to untick, just click the little blue arrow again and it will reappear.
Next we are going to change the thumbnail image for the video:
- Click on the video until the white boxes appear at the corners (instead of the x’s seen previously)
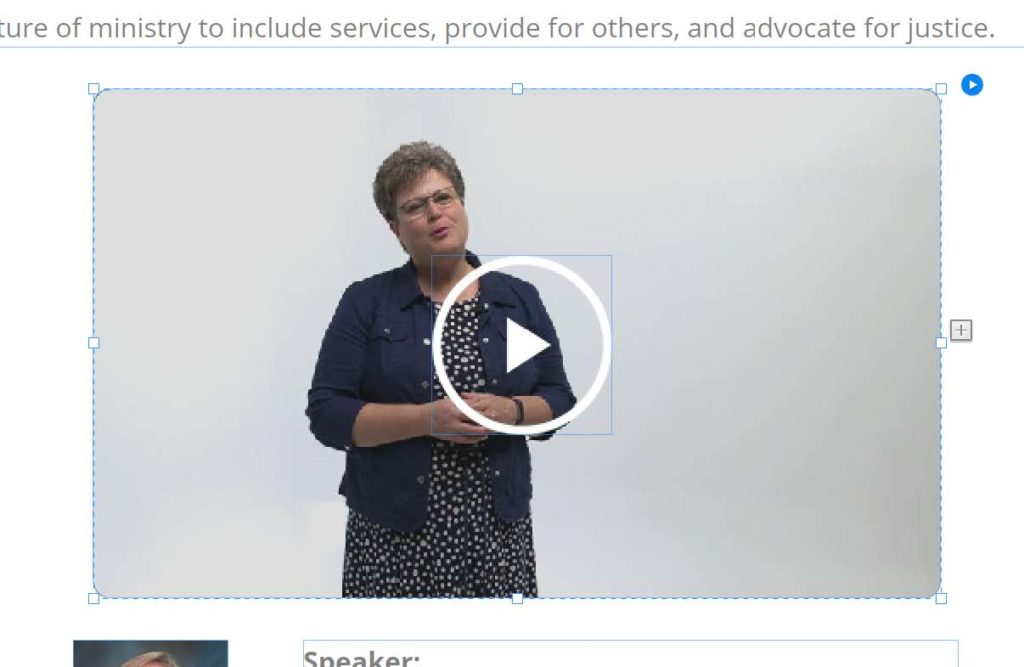
- Next – Right Click and choose “replace background image”
- Link this to the file you placed on the NAS from bright cove
- You are incorporating your thumbnail
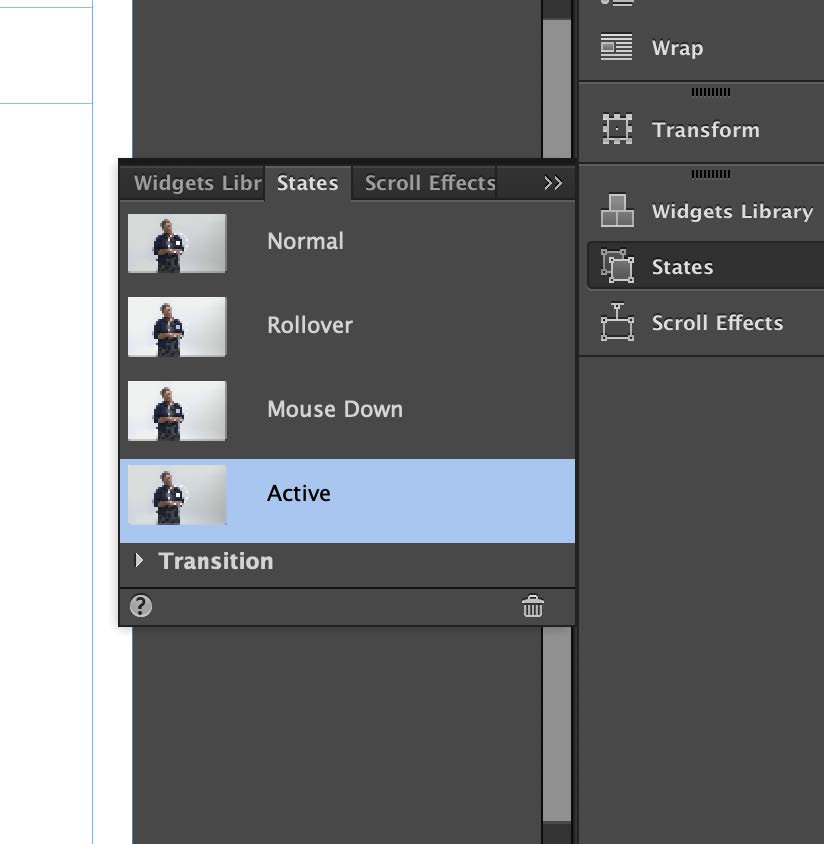
- Next you need to make sure that image is there for all of your “states”
- On the right side (or in your menu) you will find the states
- You will have to have the image selected with the white boxes in the corners to change the states
- Click each of the states and change the background image for each of the states.
- HINT: If you replace the “normal” state first, it will change the next three automatically.
How to Post to Menu for Navigation
- Next you are going to want to look at your Menu. The menu functions very similar to the video. You change the menu in the A-Master and B-Master
- You will use the same little blue play button/arrow to edit the menu. I would suggest editing it in the A-Master first, and then pasting it in the B-Master.
- When creating your menu – you will want to create a menu item for each page and each quiz.
- For example, if you have three modules, you will want to create a menu item that reads as follows:
- Module 1
- Module 2
- Module 3
- For example, if you have three modules, you will want to create a menu item that reads as follows:
- Directly across/next to the module numbers you will want your quizzes (if there are quizzes)
- Quiz 1
- Quiz 2
- Quiz 3
- Next you are going to want to copy and paste your menu into the B-Master.
- Make sure to click it once (until you see the blue X’s on the corners)
- This will ensure you copy and paste all of the layers in the menu
- Make sure to click it once (until you see the blue X’s on the corners)
- Paste it to the B-Master in the same place
- To “paste in place” – Command + option + shift + v
- Next you want to right click and make sure that the object (menu) transferred to the B-Master.
- Whenever you moving between layers, you will want to make sure it’s moving to the correct Master layer.
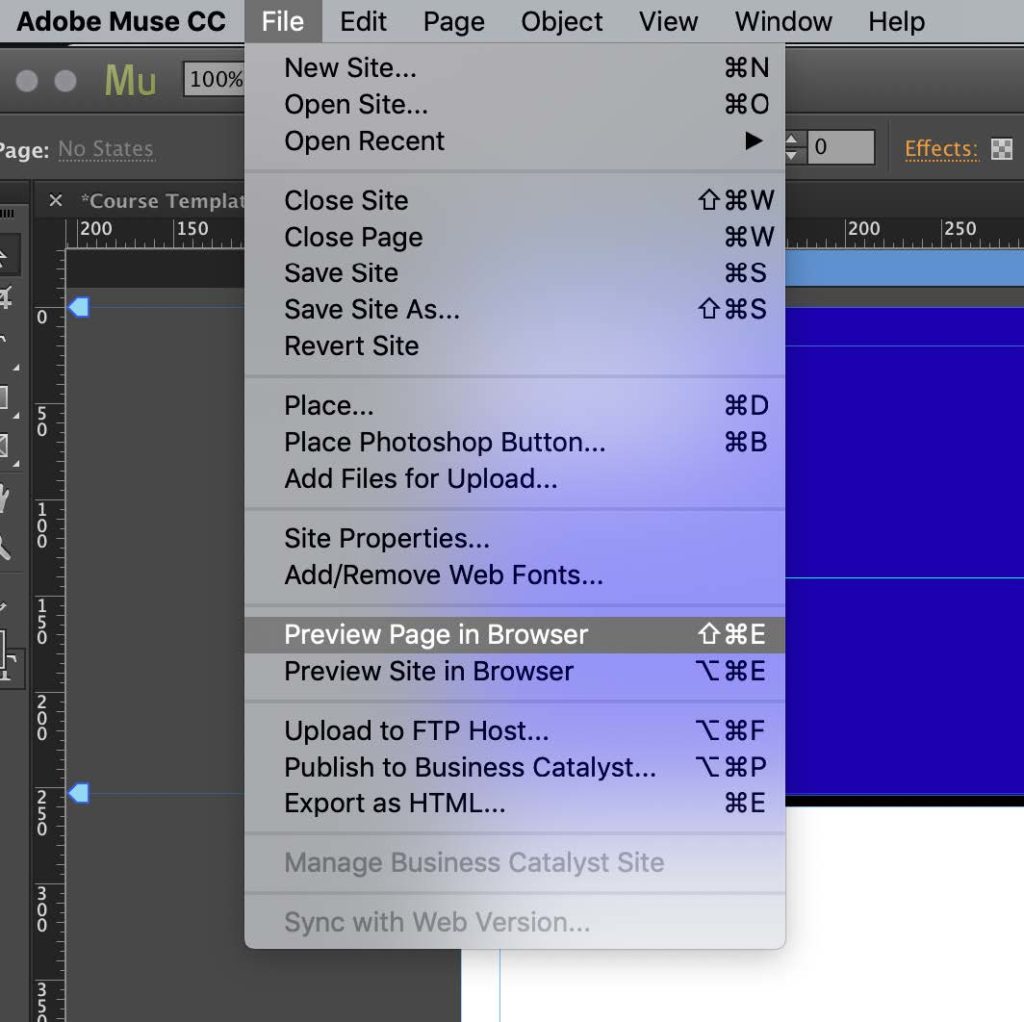
Preview Page in Browser
- You will want to preview your website in your browser from time to time to check the layout and functionality.
- Click File —> Preview Page in Browser
Creating External Links for Resources
- There will be times when you will need to link a website, book, file, etc. in your webpage.
- Select the text you want to be linked to the external file
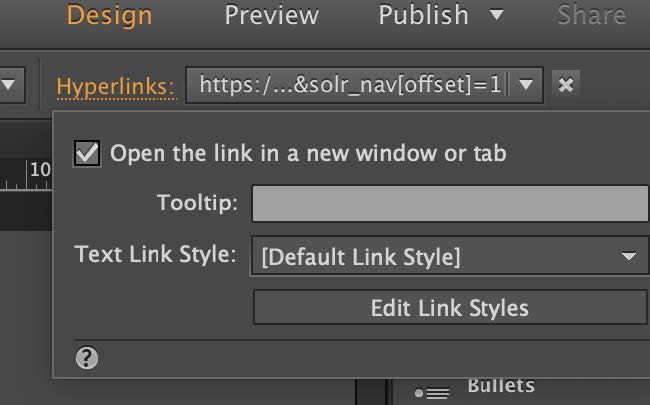
- Next, in the upper right corner you will see a section for hyperlinks.
- You can directly paste a hyperlink here, or you can link to a file that you have saved on the NAS. You will often need to do this when you have resources provided by the course author.
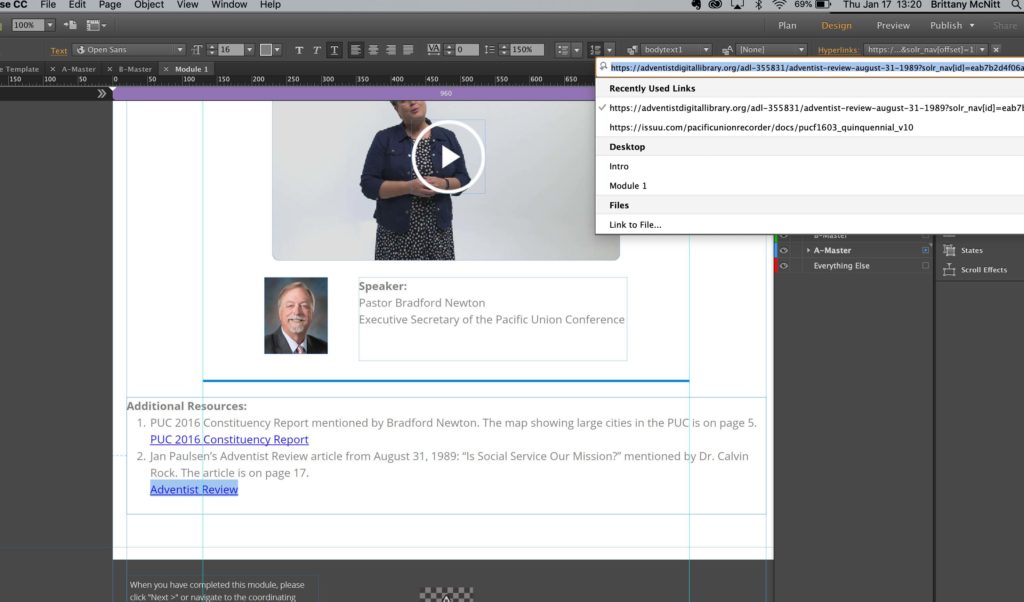
- You will also want to make sure (in the hyperlinks section you have open) to tick the box that says “Open Link in New Tab”
- This is a great habit to get into as most course authors like their links to open in new tabs.
Exporting to HTML Folder
- Once you have completed creating your course, it is time to export it to HTML.
- When you export to HTML, you are exporting to a folder you created on the NAS.
- Within your folder for this course on the NAS you should have an HTML folder. This is why you want to direct your HTML code to in Muse.
• This is what your HTML will look like when it’s been exported to the correct folder.
• To export your code go to File —> Export as HTML
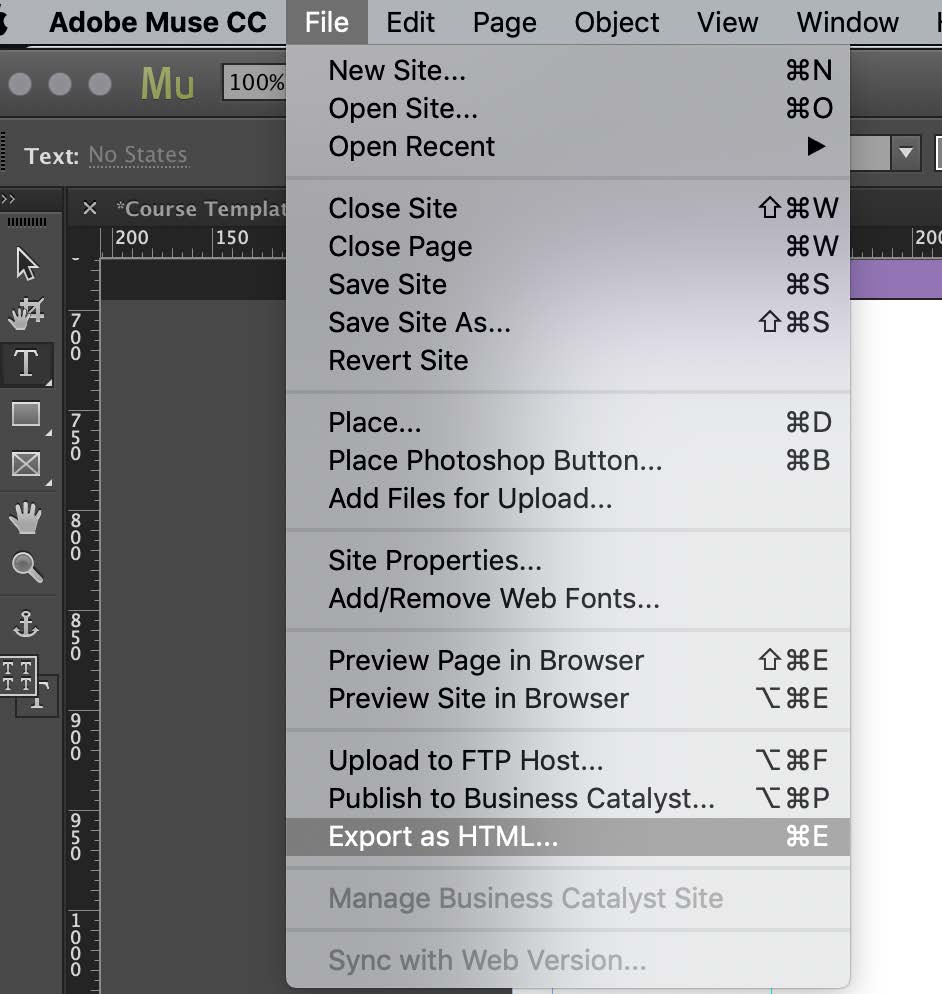
- When you click “export as HTML” you will be asked for a name. Name your course whatever the name of the course is followed by the ending “.net”
- For example, if your course is named “I Love Dogs” you can name it ilovedogs.net when you export.
- Make sure to check the location and direct it to the correct folder as sometimes Muse makes the wrong assumption as to where to send the HTML.
- This is the folder you are going to place on Filezilla in the next step.
Filezilla
- FileZilla is the software we use to push our codes to the internet to make them live. This is how to make a folder and transfer your information to that folder.
- First, launch FileZilla
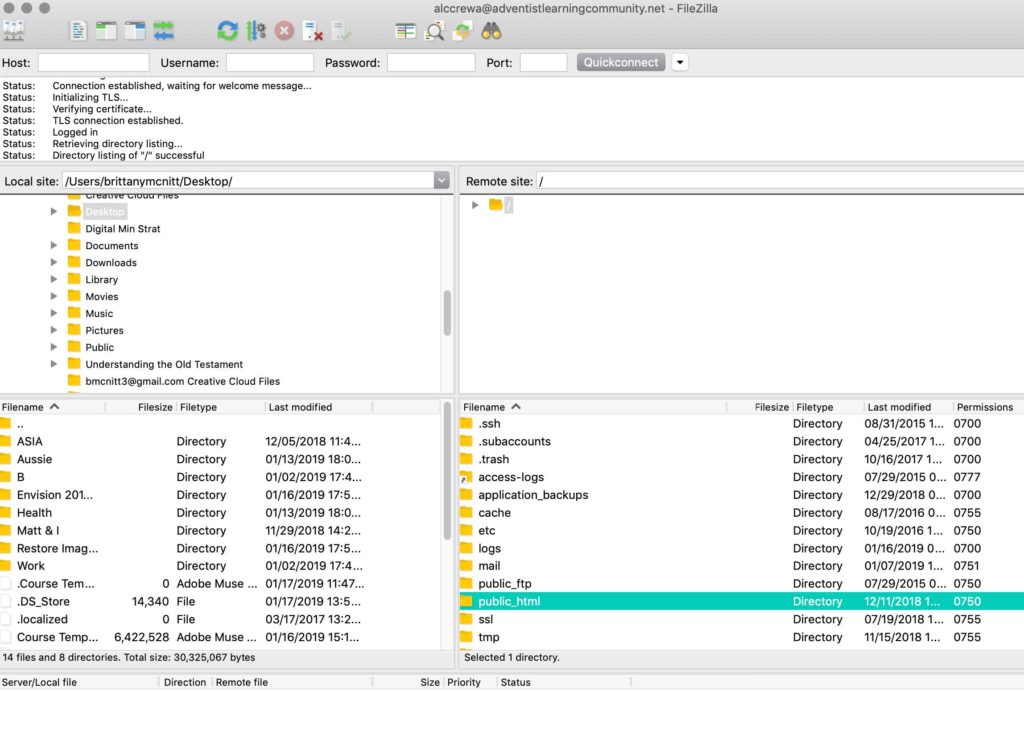
- Choose the public html folder.
- Now that you’re in the HTML folder, right click and “Create a new directory”
- Name the folder here the same name you gave your site in Muse.
- Following our same example, you will title your folder “ilovedogs”
- Next, drag your content from your HTML folder onto this folder in Filezilla.
- It will sometimes ask you if you want to “overwrite” – choose yes/ok to this option.
- Wait for FileZilla to tell you at the top that the transfer is successful