ALC Video Editor Standards
Conference Video Editing Guidelines
This is a guideline of standards for how to organize media assets within Adobe Premiere Pro, some best practices for workflow, and how to export your final rendered media. While each project could potentially have different requirements, sticking closely to these guidelines will ensure a more efficient workflow and will make it easier should another editor need to compete or collaborate with on a project.
Setting up the project
Launch Premiere and create a new project making sure it is saved in the Premiere Projects folder in our Project folder on the NAS.


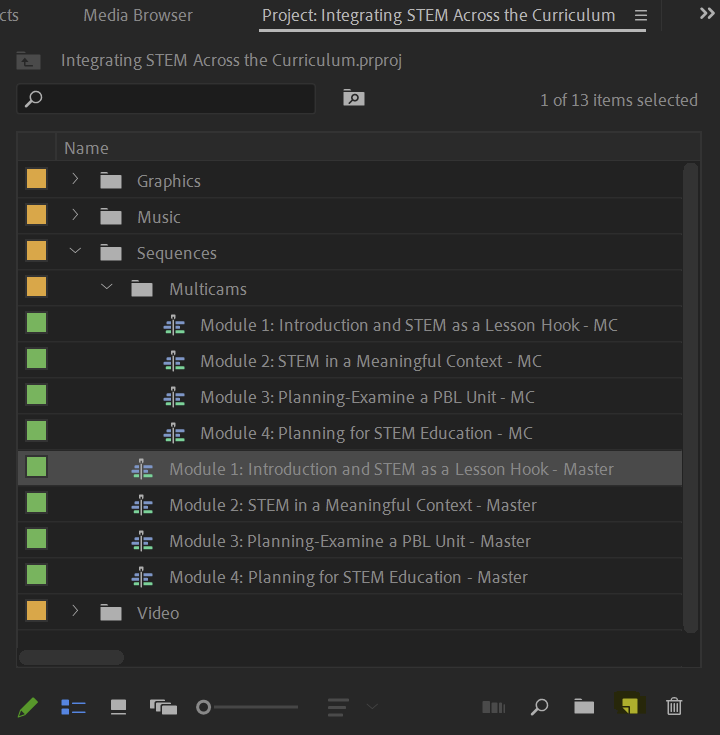
In the project window make sure you have properly labeled bins for each asset that you will be working with. These bins will somewhat mirror what is on the NAS with the exception that you may not need each assets for each project. (ie conferences most likely won’t need sound effects or have scripts) Next import all of your videos from the NAS. This part may look different depending on how the conference filming went. Below are a couple possibilities for how it should look.
Organization Option 1: Day/Camera Operator/Camera

In this option, the shoot was divided up by each day the conference was held. Each day also has subsections listing out each camera operator that was on that trip. Under each camera operators folder there should be a camera and a camera be folder as well as a master at it folder if they use the Switcher. If no switcher was used you won’t see a master edit folder.
From here you will combine the various video clips into a multi-cam sequence for editing. More on that workflow later on in this document.
After all your videos have been imported now would be a good time to also create a graphics folder where you can place all the PowerPoint presentation slides that you have received from the conference. You’ll find these power points in the graphics folder under the conference project. For help on exporting from PowerPoint to png’s check out our resource guide in the ALC Wiki

Organization Option 2: Day/Breakout Title

In this option the breakout sessions have been organized by their section titles instead of the videographer who filmed them. Also you notice in this example camera A and B are grouped together in the same folder. This is fine and won’t overall change your workflow approach but you should create a new subfolder called Video to keep them more organized and so your sequences are easier to fine later on.

After all your videos have been imported now would be a good time to also create a graphics folder where you can place all the PowerPoint presentation slides that you have received from the conference. You’ll find these power points in the graphics folder under the conference project. For help on exporting from PowerPoint to png’s check out our resource guide in the ALC Wiki
Creating Sequences – Quick Workflow
Under each breakout session bin start with creating a new sequence named by the presentation title, presenter name and event name and year. (Example: PresentationName – PresentersName – EventName_MC)
For most conferences you will have a switched master file that was recorded on the day of the event. It should have both cameras footage as well as the graphics all mixed into one Master file. We will treat this as our main file to work with and scrub though looking for any major errors that need to be fixed. Major errors could include: Someone walking out of a shot for more than 10 seconds before the camera switches, audio that is missing for part of the video, someone covering up the camera angle for more than 10 seconds, or anything that is distracting to the presentation that is not covered up relatively quickly. Small errors we will leave alone, mic pops, someone walking past the camera, or minor camera adjustments.
If you do need to fix the footage, go into your ISO bins (A Cam, B Cam) and find the clip you need and move it on top of the Master footage in the Timeline. Right click and go to Synchronize -> Audio, Track Channel 1. Let it sync your footage up. Note that the Master and ISO footage are dived up into clips, you will need to use your best guess to find which A or B Cam clip goes with which Master. Usually they are about the same number. So if your issue is on the third Master clip, and you need to switch to B Cam, start with the third B Cam clip and go from there.
Once you have the clips synced, you can trip the replacement footage to cover the mistake and then go back to using the Master clip. Hopefully you shouldn’t have to do this more that once or twice in a video.
Creating Sequences – Multicam Workflow
Under each breakout session bin start with creating a new sequence named by the presentation title, presenter name and event name and year with the underscore_MC after the title. You might need to be creative and abbreviate the Presentation name as this can create issues later on if the file name is too long. (Example: PresentationName – PresentersName – EventName_MC). If the folders or video clips are not labeled as such you will have to go into the scripts folder to try to find that information. Then grab your A and B footage that will be found in the video folder and place in in your timeline.
Your timeline should look like this. Feel free to delete any extra audio clips that are not needed.

Afterwards you can right click on audio tracks, go to delete tracks and select Delete Audio Tracks with the “All Empty Tracks” drop down selected.

After your Multicam sequence is cleaned up make sure you sync all the audio clips together. You can do this manually or by right clicking and choosing synchronize and use the option “Audio” and “Track Channel 1”
Once your MC sequence is done for now, create a new sequence based on your MC sequence by dragging the sequence icon down to the new page icon in the lower right-hand corner. From there you will rename this one to be _Master and this will be the main file that you edit off of.

Next open up each Master sequence right clicking on the video file and select Multicam->Enable
Once they have been turned into a Multicam sequence you can bring up all the monitors in your program window by click the icon below.

If you don’t see it click the plus icon in the lower right hand corner of the program monitor.

Once you see the monitors you can use them to edit your footage.
Note: To make things easier to render later, move all your – MC files to a Multicams folder, leaving all your Master timelines in the root of the Sequences folder. This will make it easy for you to shift click all the video sequences and set to render later.
Editing the Footage Together

This section will have two distinct approaches depending on how the breakouts were filmed switched or non switched.
Switched: For footage is already been switched the best approach is to use the Blackmagic Hyperdeck video as the master track but sync up the two ISO cams to that track and cut to them if there is a mistake in the live switched production. If there is no mistake you can just use the live switched version.
Your _MC file would look something like this.

Your _Master should look like this. The clip in the upper left is the Blackmagic switched footage and your other two are your ISO cams that you can cut to if there is an issue.

Non Switched: For non switched it will be traditional editing that you might have done before. Where you load up your A&B camera or C if applicable, sync them all up and making your own edits as you go.
Graphics
When complete make sure you add opening and closing bookends, title card splash screens and lower thirds as well as any graphics that may be necessary.
Bookends: Go to the NAS under Generic Assets\Logos\Video Intros to find the appropriate logo into for your project.
Title card splash screens: Open the Essential Graphics panel and you should see it. If you need to add it go to Generic Assets\Graphics\Splash Screen\EssentGraph_ templates and make sure you have the latest one by date.

Lower Thirds: Find them in the same place under the Essential Graphics Panel. If you need to add them go to Generic Assets\Graphics\Lower Thirds\EsstGraph_Templates.
PowerPoint slides: Open Powerpoint and export high rez images into a PNG sequence. (Make sure they are at least 1080p, do not scale.) If you need help making sure they are high rez see Steven or James. Import those images into the appropriate sub folder under the graphics folder in Premiere.
Color
Next you will want to clean up the color of the footage. Open the MC and apply a lumetri color grade and work to make sure the images look the best as possible and that they match each other. DO NOT do this on the edited sequences. Do this only on the MC as this will allow you to fix it once and it will ripple through.
Audio
There are three approaches to cleaning up the audio.
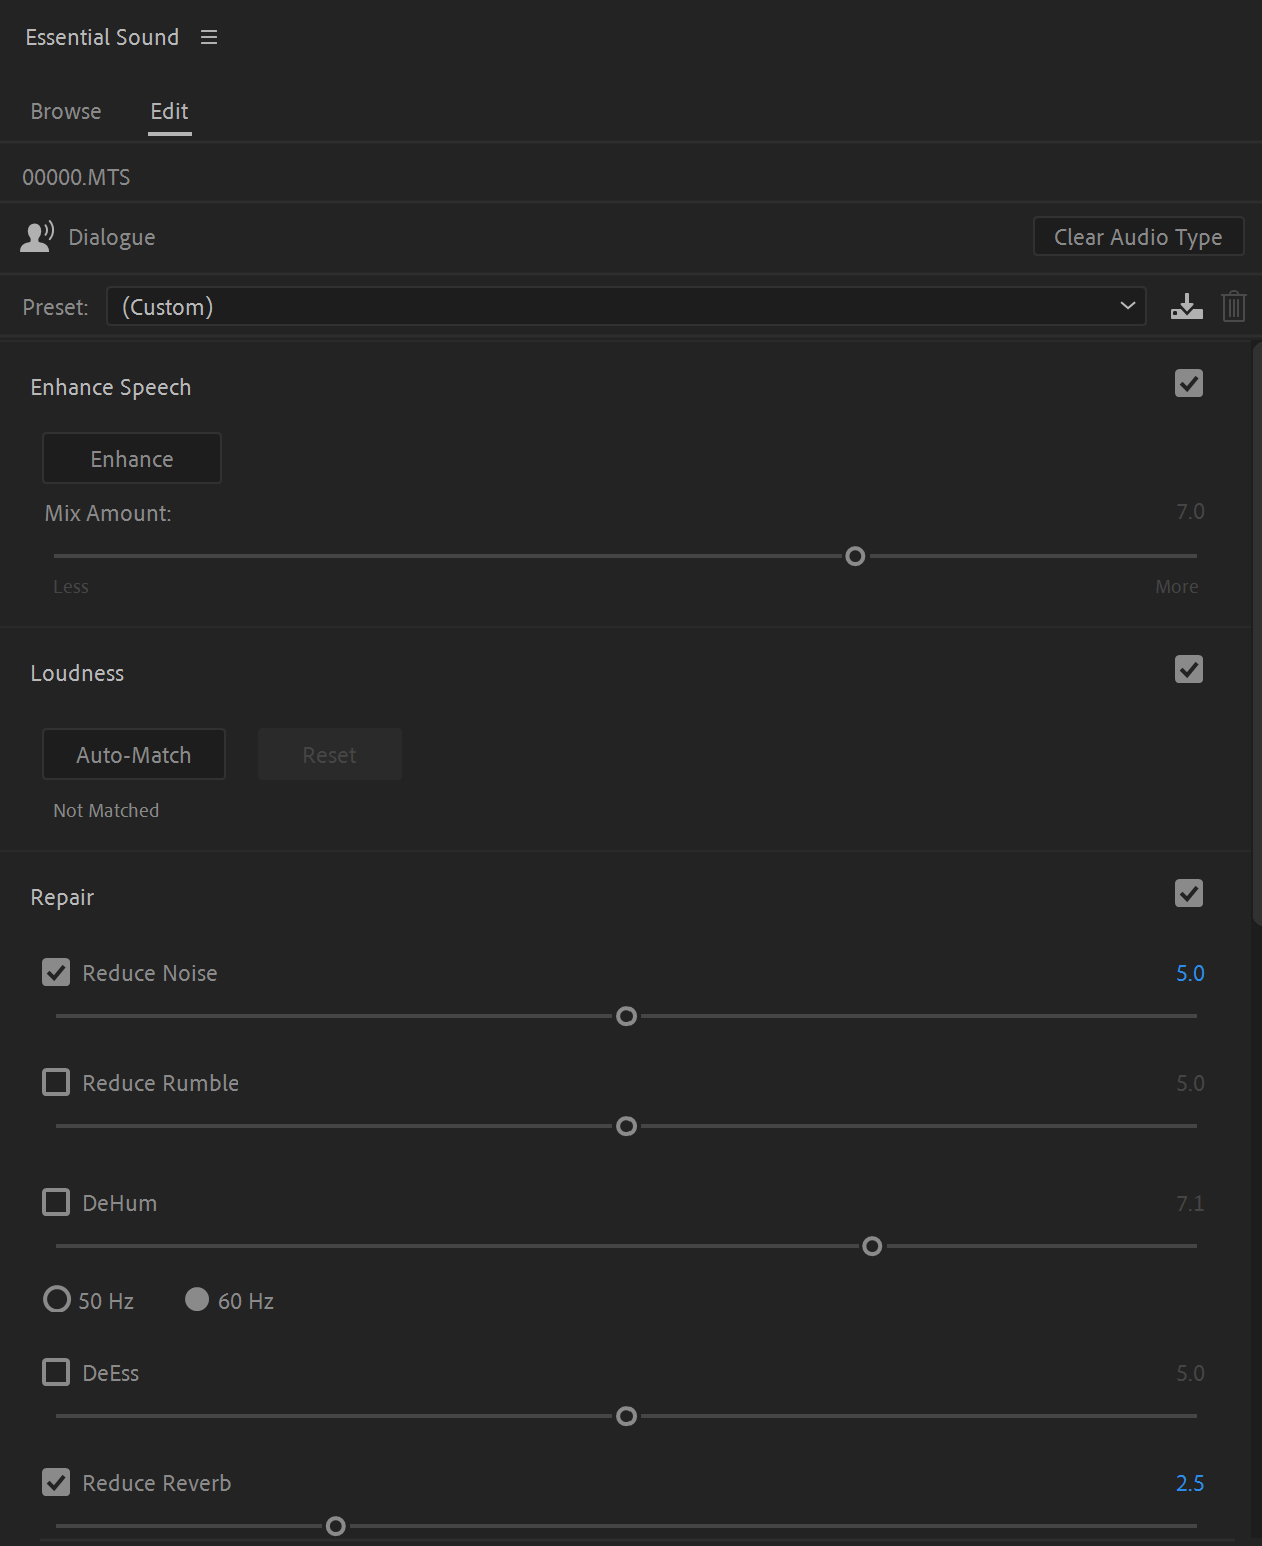
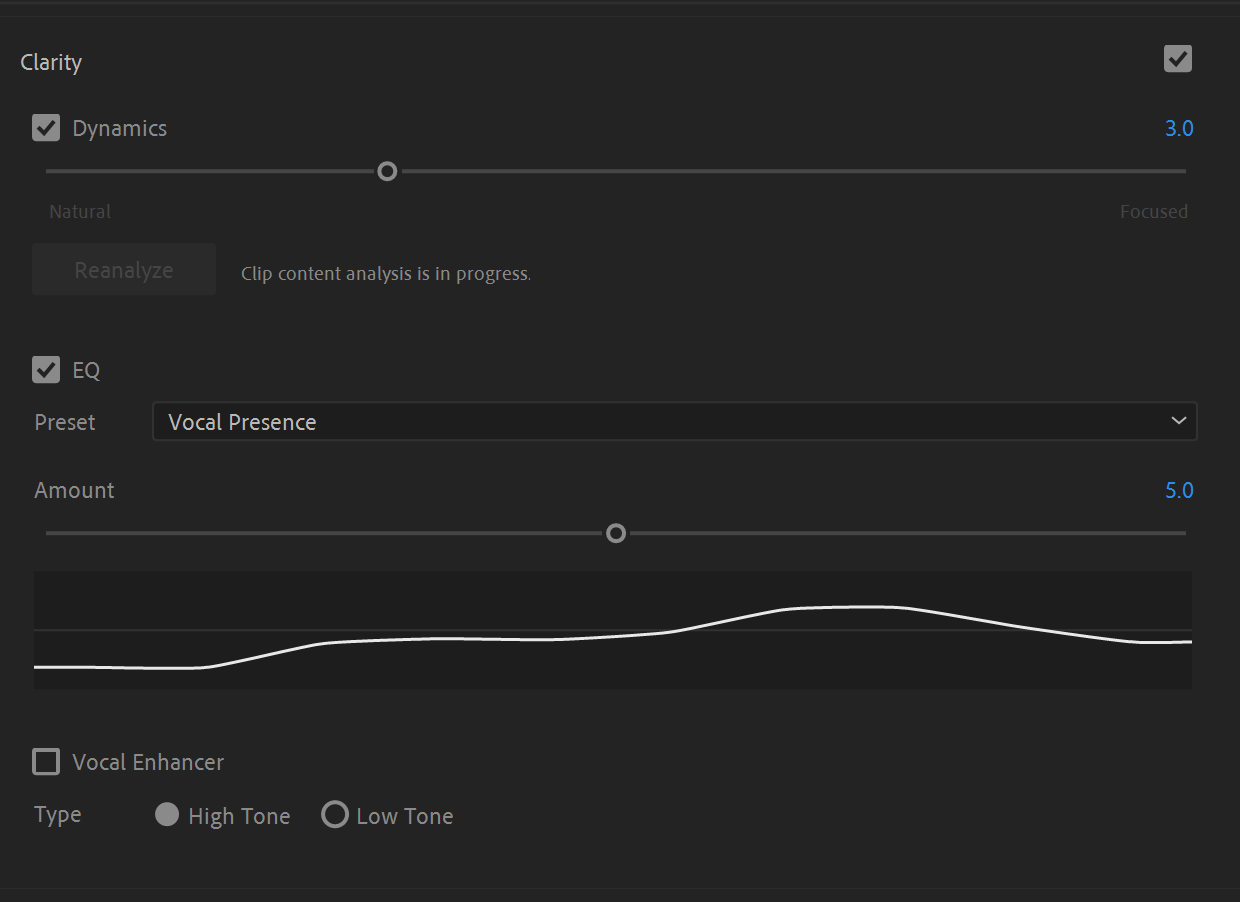
Essential Sound
You can go though the Essential Sound panel to do some very basic clean up if needed. I like to match the Loudness, run some basic noise reduction and sometimes give it a bit of clarity and EQ. You can look over the example below but audio will vary from session to session. You might want to turn a setting up or down, or not use one at all, or try a different one that you think is needed. Don’t worry about getting it perfect, just try to help the dialog come though a bit better.
For really bad audio or shotgun audio you can try the Enhance Speech option, but keep the setting to a low number, usually 2 or 3 works best as anything higher will start to sound unnatural.
Simple
- Go to each edited sequences, and apply a Multiband compressor
- Make sure its set to Broadcast (you will have to select another option and come back to this to make it work properly) Adjust your gain if its too quiet, and then set the Margin to -3.5 if there is no music and -4 if there is.
- You can also add a bit of noise reduction too if necessary.
Advanced
- Open up your MC sequence and go to Edit -> Edit in Adobe Audition -> Sequence
- Make sure video is set to none click OK.
- Make you edits in Audition, such as adding a compressor, removing noise, and any other fixes that need to happen.
- Send back to Premiere by going to Multitrack–>Export to Adobe Premiere Pro. Use Mixdown to Stereo File unless you need to separately control two speakers then choose Export each track as a stem.
- Let Premiere add it to a new track.
- Most important. Make sure your new mixdown mastered audio is the TOP level track or the multicam won’t see it and you want hear your sweenented audio. (If you need to have more than one track, it gets crazy, talk to Steven)

Exporting
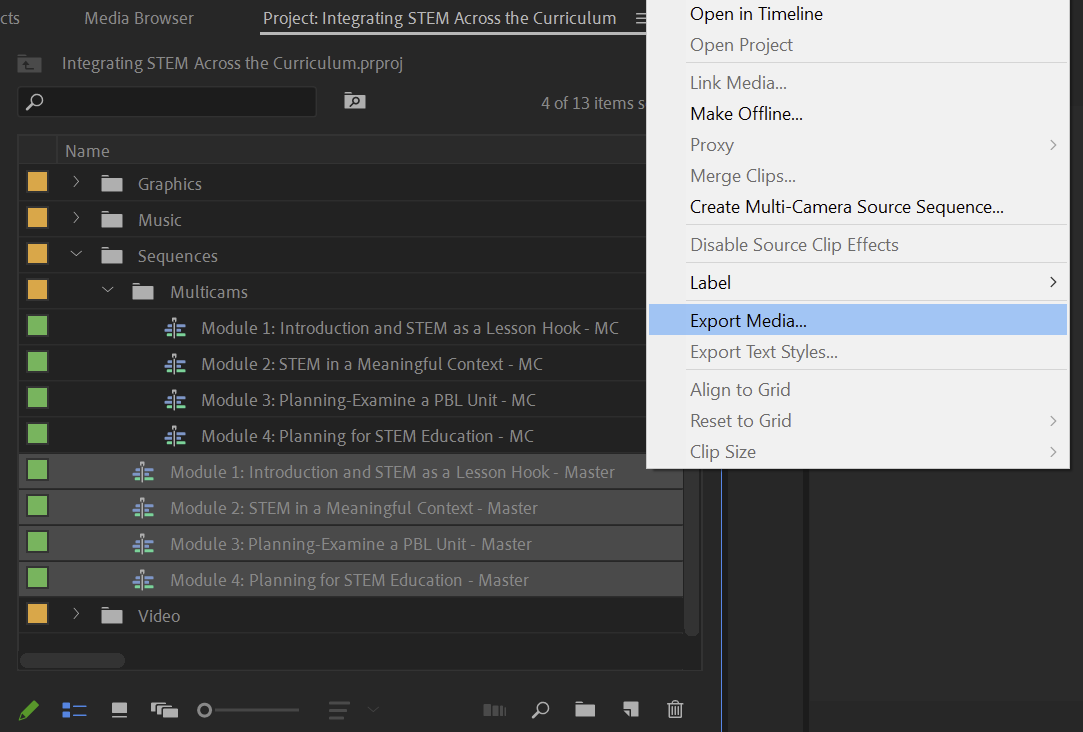
Once you are all done, shift click and right click on all the final sequences (not the MC). Go down and select export media.
When this box appears choose the DVDish settings.

Note: If you dont see DVDish installed you can install it yourself by going to Generic Assets\Encoder Presets and grabbing the .epr file. You will have to click the import settings icon to install the preset.

It will from there open in Media Encoder, make sure you choose the project’s Output folder as your final destination and you are done.
If you have any other questions or comments let Steven or James know.